Wright Test
Use the Wright Test to check for thoracic outlet syndrome in your patients. Download a free template and check out our guide on using it.
What is a Wright Test?
The Wright Test, also known as the hyperabduction test or thoracic outlet syndrome test, is a test that is used by practitioners such as physiatrists, neurologists, certain surgeons, psychiatrists, and general practitioners, to help diagnose thoracic outlet syndrome.
Before explaining the test, here's a brief 101 on thoracic outlet syndrome.
Thoracic outlet syndrome is a term used to describe a group of disorders wherein the nerves, arteries, or veins in the lower neck and upper chest area. What causes the syndrome can be unidentifiable or any of the following:
- Anatomical defects (e.g., cervical ribs)
- Hypertrophy of the anterior scalene muscle
- Repetitive motions or injuries from activities (can be related to one's job or sport)
- Pregnancy
- Bodybuilding
- Weight gain
- Tumor on the neck
- Whiplash injury
The test is meant to check the patient's symptom onset and radial pulse when the affected shoulder/arm is adducted and flexed.
Wright Test Template
Wright Test Example
How to conduct the Wright Test?
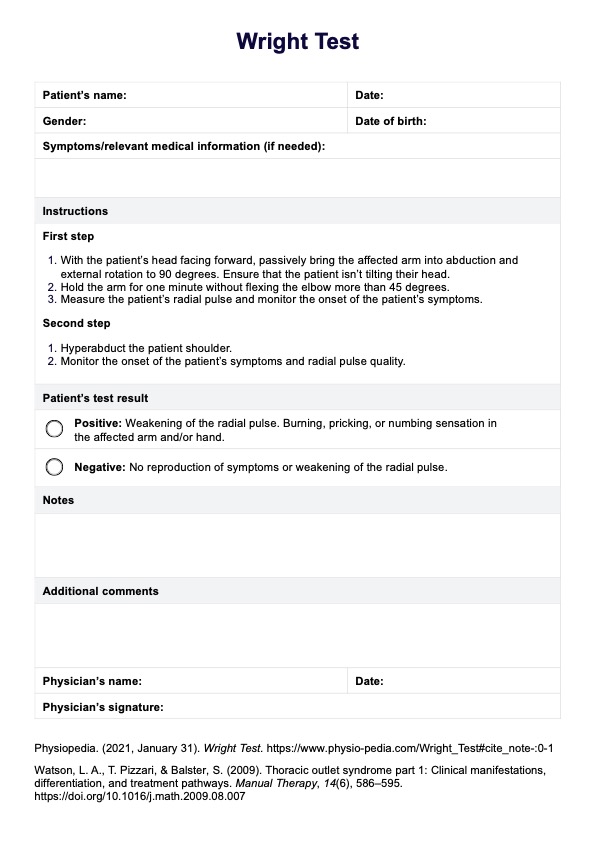
After you access and download our Wright Test template for thoracic outlet syndrome by clicking the "Download Template" or "Use Template" button in this guide, you may use it while conducting the test and recording the results. Alternatively, we've also provided instructions on how to conduct the test below.
Step 1: Do the first step
With the patient’s head facing forward, passively bring the affected arm into abduction and external rotation to 90 degrees. As you do these, ensure that the patient isn't tilting their head and that you're not flexing the elbow more than 45 degrees. Assess their condition by measuring the patient's radial pulse and monitoring the onset of the patient's symptoms while they're in this position.
Step 2: Do the second step
After assessing, hyper abduct the patient's shoulder. Then, also monitor the onset of the patient’s symptoms and radial pulse quality to assess their condition.
Step 3: Score and interpret
When you finish the assessment, you can proceed with scoring and interpreting your patient's result. Here's the test result guide you'll find written on your template:
It is a positive test if there's a reproduction of the patient's symptoms:
- Weakening of the radial pulse.
- Burning, pricking, or numbing sensation in the affected arm and/or hand.
Step 4: Record your patient's results
To record your patient's result, you simply have to tick either the negative or positive checkbox and write down any additional notes you may have. Afterward, if they're positive, you can do further testing since the Wright Test alone is an insufficient basis for diagnosing. Some additional tests usually performed other physical examinations and provocative tests, imaging tests, chest MRI, arteriography, and venography.
When to use these Wright assessments?
One can use the Wright assessment and its corresponding template when the patient has symptoms of thoracic outlet syndrome. To help you out, here's a list of the expected symptoms per type:
Neurogenic thoracic outlet syndrome
- Arm, shoulder, or neck pain or weakness
- Numbness and/or tingling in the hand or fingers
- Muscle atrophy in hands
Venous thoracic outlet syndrome
- Swelling, bluish discoloration/cyanosis, weakness, or heaviness in the affected arm or hand
Arterial thoracic outlet syndrome
- Pain, coldness, lack of pulse, and color in the affected arm or hand
Aside from these, the practitioner may also use this test if the patient has any of the conditions or participates in activities that may become the cause of thoracic outlet syndrome if not recognized, diagnosed, or treated early on.
Benefits of these free Wright Test templates
Even if the Wright Test is straightforward, there are still benefits to downloading and using our templates. Some examples include:
Easy to use
Not only is Wright's test short and easy to understand, but the template itself is easy to use. You only have to tick the checkbox that matches your observation and write notes. There's no need to undergo extra steps to obtain a copy of the template and record the patient's results.
Fast results
Without setting up equipment and with only six steps to follow to conduct the test, you can quickly obtain results in less than 10 minutes at most.
Encourages communication
If the patient tests positive, this signals you to proceed with further testing and ask your patient about the cause of the possible diagnosis. This can help formulate a treatment plan should the patient end up being diagnosed with thoracic outlet syndrome.
Inexpensive
Compared to other tests that may cost money for the patient and the hospital/clinic, the Wright Test is an inexpensive assessment a practitioner may start with to eliminate other possible diagnoses.
Easily accessible
With our digital Wright Test template, you can easily access and edit it on any gadget you have. If you save it on Carepatron, you can even share the template with fellow practitioners caring for the same patient by giving them access to view the results.
Commonly asked questions
You use the Write test by following the instructions provided and observing the radial pulse of the client throughout. On the other hand, the “How does this Wright Test work?” section explains how to download and use the Wright Test template step-by-step.
You can administer the test quickly and immediately get results. For a full list of benefits of using the test and the template, please refer to the “Benefits of these free Wright test templates” section above.
It is one of the provocative tests used for diagnosing thoracic outlet syndrome.
Physicians can use the brachial plexus compression test and the elevated arm stress test to assess thoracic outlet syndrome or thoracic outlet syndrome. Depending on the type of thoracic outlet syndrome, one can also conduct more spec tests like the medial antebrachial cutaneous nerve conduction study.