Biceps Tendonitis Exercises Handout
Discover the benefits of our Biceps Tendonitis Exercises Handout for physical therapists. Download now and enhance patient care with this PDF.
What is biceps tendonitis?
Biceps tendonitis is a condition that affects the biceps tendon, which connects the biceps muscle to the shoulder joint. This tendon runs along the front of the shoulder and plays a crucial role in arm movement, particularly during activities like shoulder flexion or rotation. The condition is often caused by repetitive overhead motions, overuse, or strain on the injured biceps tendon, leading to inflammation and irritation.
Common symptoms include shoulder pain, tenderness near the front of the shoulder, and muscle pain during movement. Weakness in the injured arm, along with a clicking or snapping sensation, may also occur. In some cases, the condition develops due to natural wear and tear over time or from acute injuries. Proper care, including biceps stretches and exercises targeting the shoulder blades and surrounding muscles, can help manage symptoms and promote recovery.
Biceps Tendonitis Exercises Handout Template
Biceps Tendonitis Exercises Handout Example
Exercises for bicep tendonitis
Exercises play a crucial role in managing biceps tendonitis by reducing pain, improving strength, and restoring flexibility to the affected shoulder. Gentle stretching exercises can help alleviate stiffness and improve the range of motion while strengthening exercises target the surrounding muscles to support the tendon and reduce strain during movement.
Healthcare professionals can use the following exercises to help patients recover from biceps tendonitis. These exercises aim to reduce pain, improve shoulder mobility, and strengthen the surrounding muscles to prevent future injuries:
1. Biceps curls
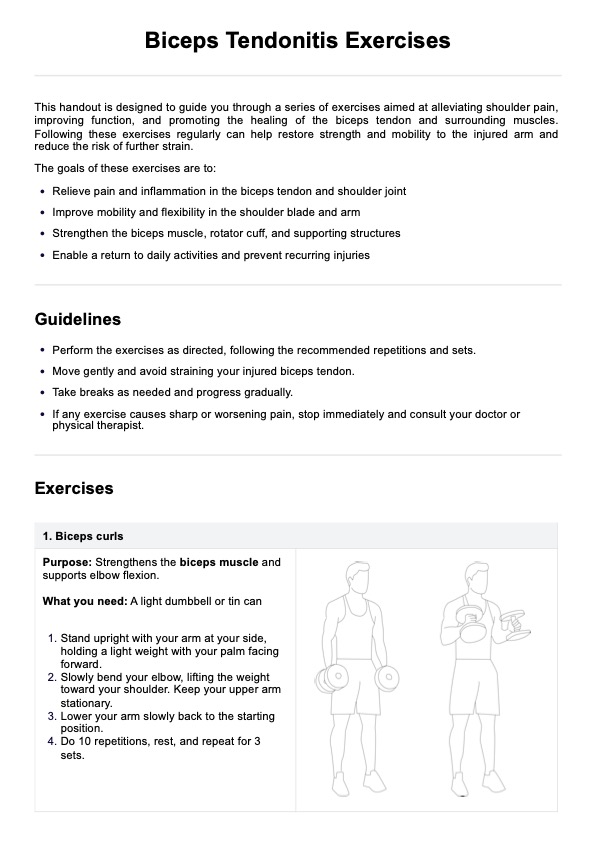
Stand the patient upright with the affected arm resting by their side, holding a lightweight such as a dumbbell or tin can with their palm facing forward. Instruct the patient to keep their upper arm stationary and slowly bend their elbow, lifting the weight toward their shoulder. Once the weight reaches the top, have them lower it back to the starting position in a controlled manner. Repeat this 10 times, completing 3 sets with rest periods in between. Emphasize slow, controlled movements to avoid straining the tendon.
2. Biceps stretch
Have the patient stand facing a wall about 6 inches away, with their arm raised to the side at shoulder height. Instruct them to rotate their hand forward so their thumb touches the wall and their palm faces downward. Guide the patient to gently twist their body away from the raised arm until they feel a stretch in the biceps. Hold this position for 15 seconds, then return to the starting position. Repeat the stretch 3 times, ensuring they do not pull the shoulder backward to prevent overstretching.
3. Shoulder flexion
Position the patient standing upright with their arm resting by their side and palm facing their thigh. Instruct them to slowly lift the arm straight in front of their body until their fingers point toward the ceiling. Once the arm is raised, have them hold the position for 5 seconds before lowering it back down to the starting position. Encourage the patient to perform 10 repetitions per set, with 3 sets spread throughout the day. Advise them to avoid reaching overhead or backward, which may irritate the tendon.
4. Shoulder internal rotation
Provide the patient with a towel and instruct them to drape it over their non-injured shoulder, holding one end with their non-injured hand. Have them reach behind their back with the injured arm and grasp the other end of the towel. Instruct the patient to use their non-injured hand to gently pull the towel upward, stretching the injured shoulder. Hold the stretch for 30 seconds, then release and return to the starting position. Repeat this exercise twice daily, ensuring the stretch is gentle and pain-free.
5. Shoulder external rotation
Equip the patient with a resistance band and instruct them to hold it with both hands, elbows bent at 90 degrees and tucked into their sides. Guide them to slowly pull the band outward by rotating their shoulders, keeping the elbows stationary. Once they reach their limit, have them return to the starting position in a controlled motion. Instruct the patient to perform 10 repetitions per set, completing 3 sets daily. This exercise helps strengthen the rotator cuff and stabilize the shoulder joint.
6. Forearm supination and pronation
Position the patient with their arms at their sides, elbows bent at a 90-degree angle, and palms facing downward. Instruct them to rotate their forearm so their palm faces upward, holding the position for 5 seconds before returning to the starting position. Have them alternate between these positions for 10 repetitions per set and complete 3 sets throughout the day. This exercise enhances forearm flexibility and reduces strain on the biceps tendon.
7. Shoulder circle crossover
Have the patient stand with their arms extended to the sides and palms facing forward. Instruct them to squeeze their shoulder blades together and slowly move their arms back slightly. Guide them to lift their arms upward, turning their palms forward, until their hands cross horizontally in front of their body. Once in this position, have them reverse the motion until their palms face backward behind them. Repeat this exercise 3–6 times, completing 1–2 sets. Emphasize maintaining good posture and avoiding overextension of the shoulders.
How to use our Bicep Tendonitis Exercises Handout
Our Biceps Tendonitis Exercises Handout provides a structured and detailed approach to help patients rehabilitate their biceps tendon and surrounding shoulder structures. This handout includes clear instructions and illustrations for each exercise, ensuring patients can follow along with confidence and accuracy.
Step 1: Download the handout
Download the Biceps Tendonitis Exercises Handout from the Carepatron platform or access it through our resource library. This ensures you and the patient have a comprehensive guide to refer to throughout the rehabilitation process.
Step 2: Review with the patient
Sit down with the patient to review the handout together. Walk them through each exercise, explaining its purpose and how it supports their recovery. Emphasize the importance of consistent, correct execution to maximize the benefits and prevent further strain on the biceps tendon.
Step 3: Demonstrate each exercise
Demonstrate each exercise for the patient, focusing on proper form and technique. Highlight key movements and common mistakes to avoid. This hands-on demonstration will help the patient feel more comfortable and confident in performing the exercises independently.
Step 4: Provide clear instructions
Offer the patient clear, concise instructions on how to follow the exercise handout. Stress the importance of adhering to the prescribed frequency, repetitions, and rest periods for each exercise. Encourage them to ask questions if they are unsure about any part of the program, ensuring they feel fully prepared.
Step 5: Schedule follow-up appointments
Regular follow-up appointments are essential for monitoring the patient’s progress. Use these sessions to reassess their condition, adjust their exercise program as needed, and address any challenges they may be facing. Consistent follow-up provides ongoing support and ensures the patient stays on track toward recovery.
How will professionals benefit from using this handout?
The Biceps Tendonitis Exercises Handout is an invaluable resource for healthcare professionals, offering a clear, structured guide to support the rehabilitation of patients with biceps tendonitis. With detailed instructions for exercises, the handout focuses on strengthening key areas like the biceps muscles, rotator cuff, and shoulder joint while ensuring proper technique and gradual progression.
This comprehensive tool helps physical therapists and healthcare providers save time by providing a ready-made plan that ensures consistency in patient care. Its concise and easy-to-understand descriptions allow professionals to effectively demonstrate exercises. The handout also educates patients on managing pain and avoiding common mistakes, empowering them to feel confident in their recovery. By incorporating this handout, professionals can deliver efficient, high-quality, and evidence-based care with ease.
Commonly asked questions
Biceps tendonitis exercises are designed to promote pain relief, reduce swelling, and restore function to the shoulder joint and biceps tendons. These gentle exercises target key areas, including the biceps muscles, rotator cuff muscles, and shoulder blade, to strengthen the injured arm and improve mobility.
It’s important to avoid making pain worse by focusing on gentle exercises that prioritize the injured side. Keep movements slow and controlled, such as when you slowly raise or lower your arm, gently turn your forearm, or move into a stretch position. Avoid pulling the shoulder backwards or using heavy weights during tendonitis exercises. Exercises like the sleeper stretch and forearm twists should be performed to a gentle stretch point without causing discomfort. Always consult a physical therapist to ensure proper form and avoid aggravating the coracoid process, short head, or long head of the biceps tendons.
Start with gentle stretches and light movements, such as letting the injured arm hang or gently bending the elbow. Use tools like an exercise band positioned at waist height to perform movements like shoulder external rotation. Gradually progress to more advanced exercises, such as bicep curls or forearm twists, ensuring your elbow remains at a right angle for stability. If you feel pain during any movement, stop immediately and consult your physical therapist.