Wrist Anatomy Diagram
Download our wrist anatomy diagram template for educational and clinical purposes.

Fact Checked by Ericka Pingol.


Introduction to wrist function
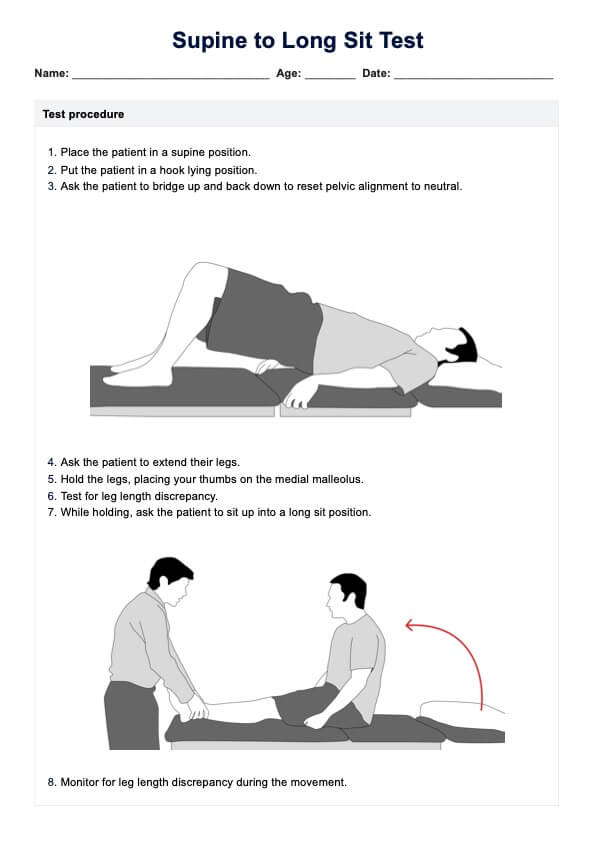
The wrist has several functions, mainly facilitating movements and functions essential for daily activities. The intricate arrangement of the bones, muscles, ligaments, and more gives the hand dexterity and versatility, allowing the wrist to bend, straighten, rotate, and move laterally. These movements are vital for grasping objects, typing, and writing, all requiring precision and control.
In addition, the wrist is a conduit for transferring forces from the arm to the hand, essential for lifting, pushing, and pulling activities. This force transfer ensures that the hand can perform a wide range of actions with the necessary strength and stability. Finally, the wrist provides both strength and flexibility that aids the hand with powerful grips and fine motor skills, making it possible to perform complex tasks easily.
Overall, the wrist's structure and function are integral to the hand's ability to interact effectively with the surrounding environment, underscoring its importance in everyday activities.
Wrist Anatomy Diagram Template
Wrist Anatomy Diagram Example

What is a Wrist Anatomy Diagram?
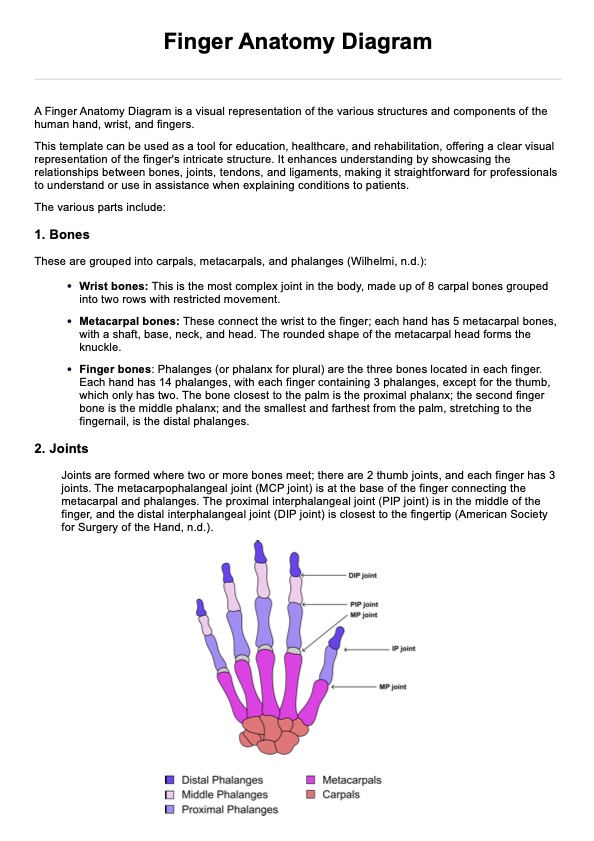
A Wrist Anatomy Diagram is a visual representation of the complex joint that is the wrist that comprises the distal ends of the radius and ulna, forearm bones, eight carpal bones, the proximal ends of five metacarpal bones, connective tissue, tendons, ligaments, and vessels. Aside from an illustration or image of the wrist, it may also contain labels of the parts of the wrist joint, such as:
- Wrist bones: Eight carpal bones are organized into two, which are the proximal carpal row (scaphoid bone, lunate, triquetrum, and pisiform) and distal carpal row (trapezium, trapezoid, capitate, and hamate).
- Muscles and tendons: Flexor tendons (flexor carpi radialis and flexor carpi ulnaris tendon) and extensor tendons (extensor carpi rialis brevis tendon, extensor carpi radialis longus tendon, extensor capri ulnaris tendon)
- Nerves: Median nerve, radial nerve, ulnar nerve
- Ligaments: radial collateral ligament, dorsal radiocarpal ligaments, ulnar collateral ligaments, volar carpal ligaments
- Blood and lymphatics vessels: Arteries and veins
Note that other diagrams may include both hand and wrist anatomy.
How to use our Wrist Anatomy Diagram template
Once you obtain a wrist anatomy diagram template by clicking the links in this guide or accessing it through Carepatron's template gallery, here's a step-by-step on how to use it effectively:
Step 1: Study and explore
Examine the diagram closely. Look for labels indicating bones, muscles, tendons, nerves, and blood vessels. Understand their location, positions, importance, and relationships.
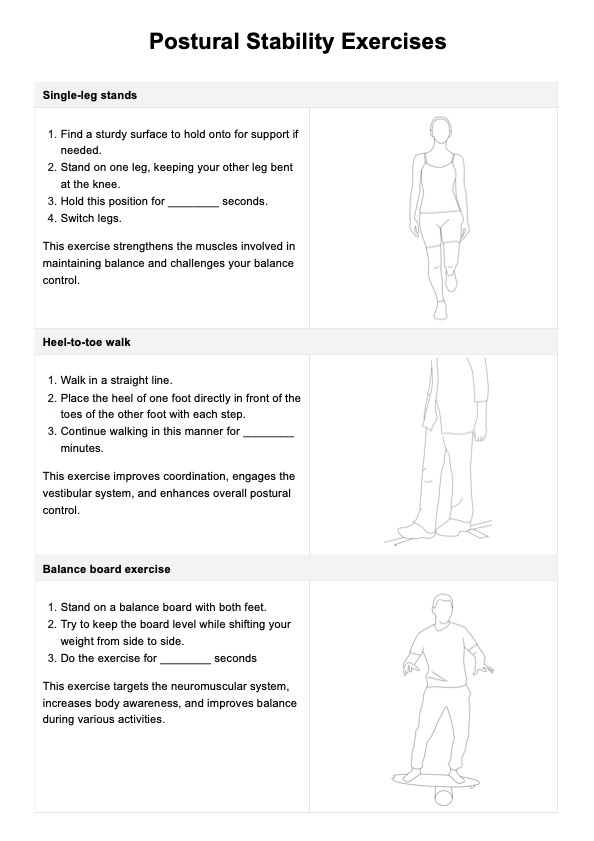
Step 2: Learn movements
Observe how the wrist allows movement. It can bend (flexion), straighten (extension), move laterally (radial and ulnar deviation), and rotate (pronation and supination).
Step 3: Use the template
Use the diagram to measure the anatomy for your tests or to understand common injuries (fractures, sprains, tendinitis) and conditions (arthritis, carpal tunnel syndrome) for clinical purposes.
Benefits of using this diagram
Understanding wrist anatomy is paramount for diagnosing and treating injuries effectively. Utilizing a wrist anatomy diagram template offers numerous benefits for clinicians, medical students, and patients.
- Aids in history-taking and physical examinations: The diagram enhances the appreciation of wrist biomechanics, aiding healthcare providers in efficient history-taking and physical examinations, further supporting accurate diagnosis and informed treatment decisions.
- Helps manage conditions: Wrist diagrams elucidate the intricate structure of the wrist, which is crucial for managing conditions such as sprains, fractures, and carpal tunnel syndrome.
- Facilitate better communication: By providing a clear and comprehensive view of the wrist's anatomy, these diagrams facilitate better communication between clinicians and patients, promoting a more thorough understanding of the condition and the rationale behind treatment plans.
Common treatments for wrist injuries
Wrist injuries can vary in severity, and treatments depend on the specific condition. Here are some common wrist injuries and their treatments:
- Fractures: When a bone in the wrist is broken, proper alignment is essential for healing. A cast or splint is often used to hold the bone fragments together while they mend, ensuring stability and promoting recovery.
- Sprains and strains: For injuries involving tendons or ligaments, rest is crucial. Pain relievers can help manage discomfort, and wearing a splint can protect the injured area during the healing process.
- Carpal Tunnel Syndrome: This nerve-related condition is commonly treated with rest and nonprescription pain relievers such as ibuprofen. In some cases, corticosteroid injections are administered to reduce inflammation.
- Tendon Problems: Physical therapy plays a vital role in treating tendon injuries, helping to restore function and strength. In severe cases, surgery may be necessary, followed by a structured rehabilitation program to ensure a successful recovery and regain full wrist functionality.
Commonly asked questions
Among the common ways are falls, traumas, and sports injuries.
Depending on the injury and its severity, wrist injuries can take as short as 2 weeks to heal and longer than 2 months.
There are multiple mnemonics one can use, such as "Straight Line to Pinky, Here Comes the Thumb" and "Some Lovers Try Positions That They Cannot Handle"
Related Templates

Popular Templates