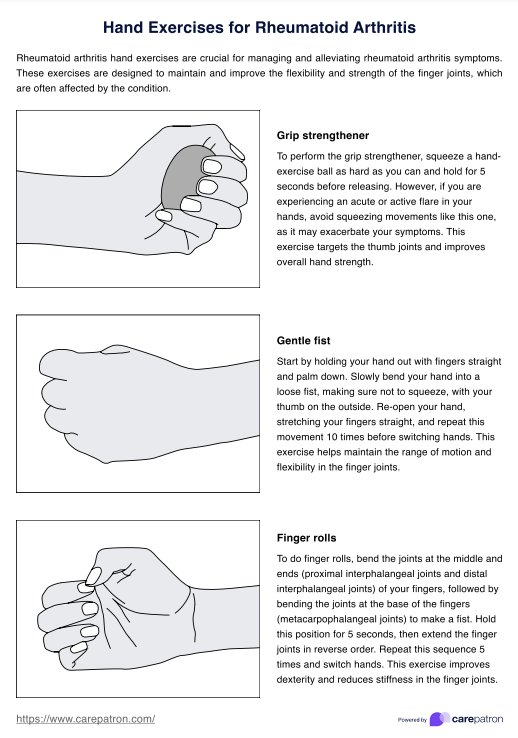
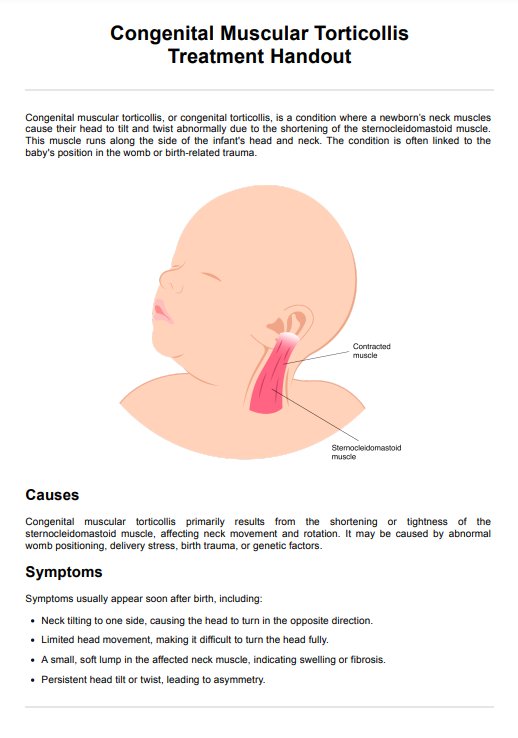
Heel Thump Test
Learn how the Heel Thump Test helps diagnose syndesmosis injuries, including its procedure, benefits, and limitations, with our detailed guide and template.

Fact Checked by Ericka Pingol.


What are lateral ankle sprains?
Lateral ankle sprains are common orthopedic and athletic injuries where the foot twists beyond its normal motion, leading to stretched or torn ligaments on the ankle's outer side. Symptoms include pain, swelling, and limited mobility. These sprains primarily affect stabilizing ligaments, making accurate diagnosis crucial for effective management. The severity ranges from mild (stretching and microscopic tearing) to severe (complete tearing), underscoring the need for precise diagnostic tools.
Heel Thump Test Template
Heel Thump Test Example
What are ankle syndesmosis injuries?
Ankle syndesmosis injuries, often referred to as "high ankle sprains," involve the ligaments connecting the tibia and fibula above the ankle joint (the posterior tibiofibular ligament). Unlike lateral ankle sprains, which affect the ligaments on the outer side of the ankle, a syndesmotic ankle sprain impacts the ligaments between the bones of the lower leg, causing pain and instability higher up on the ankle. These injuries typically result from rotational or forceful stretching movements and are characterized by pain that radiates along the interosseous membrane between the tibia and fibula.
Recognizing the difference between these and more common lateral ankle sprains is critical as they require different management strategies and have a longer recovery time.
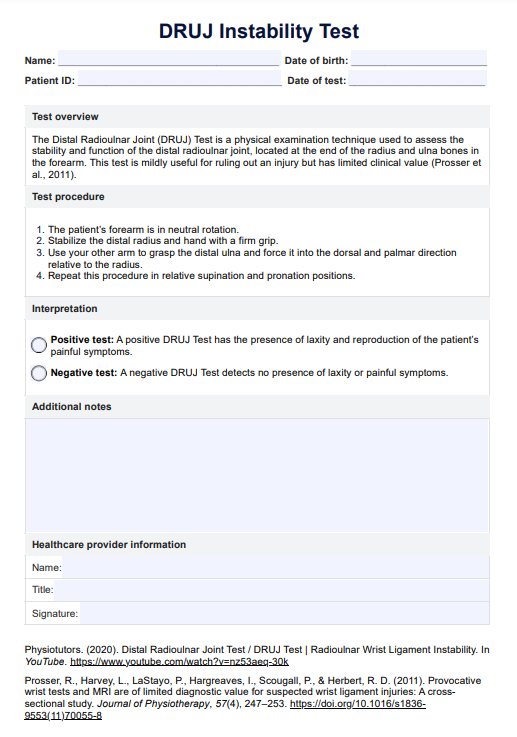
What is the Heel Thump Test?
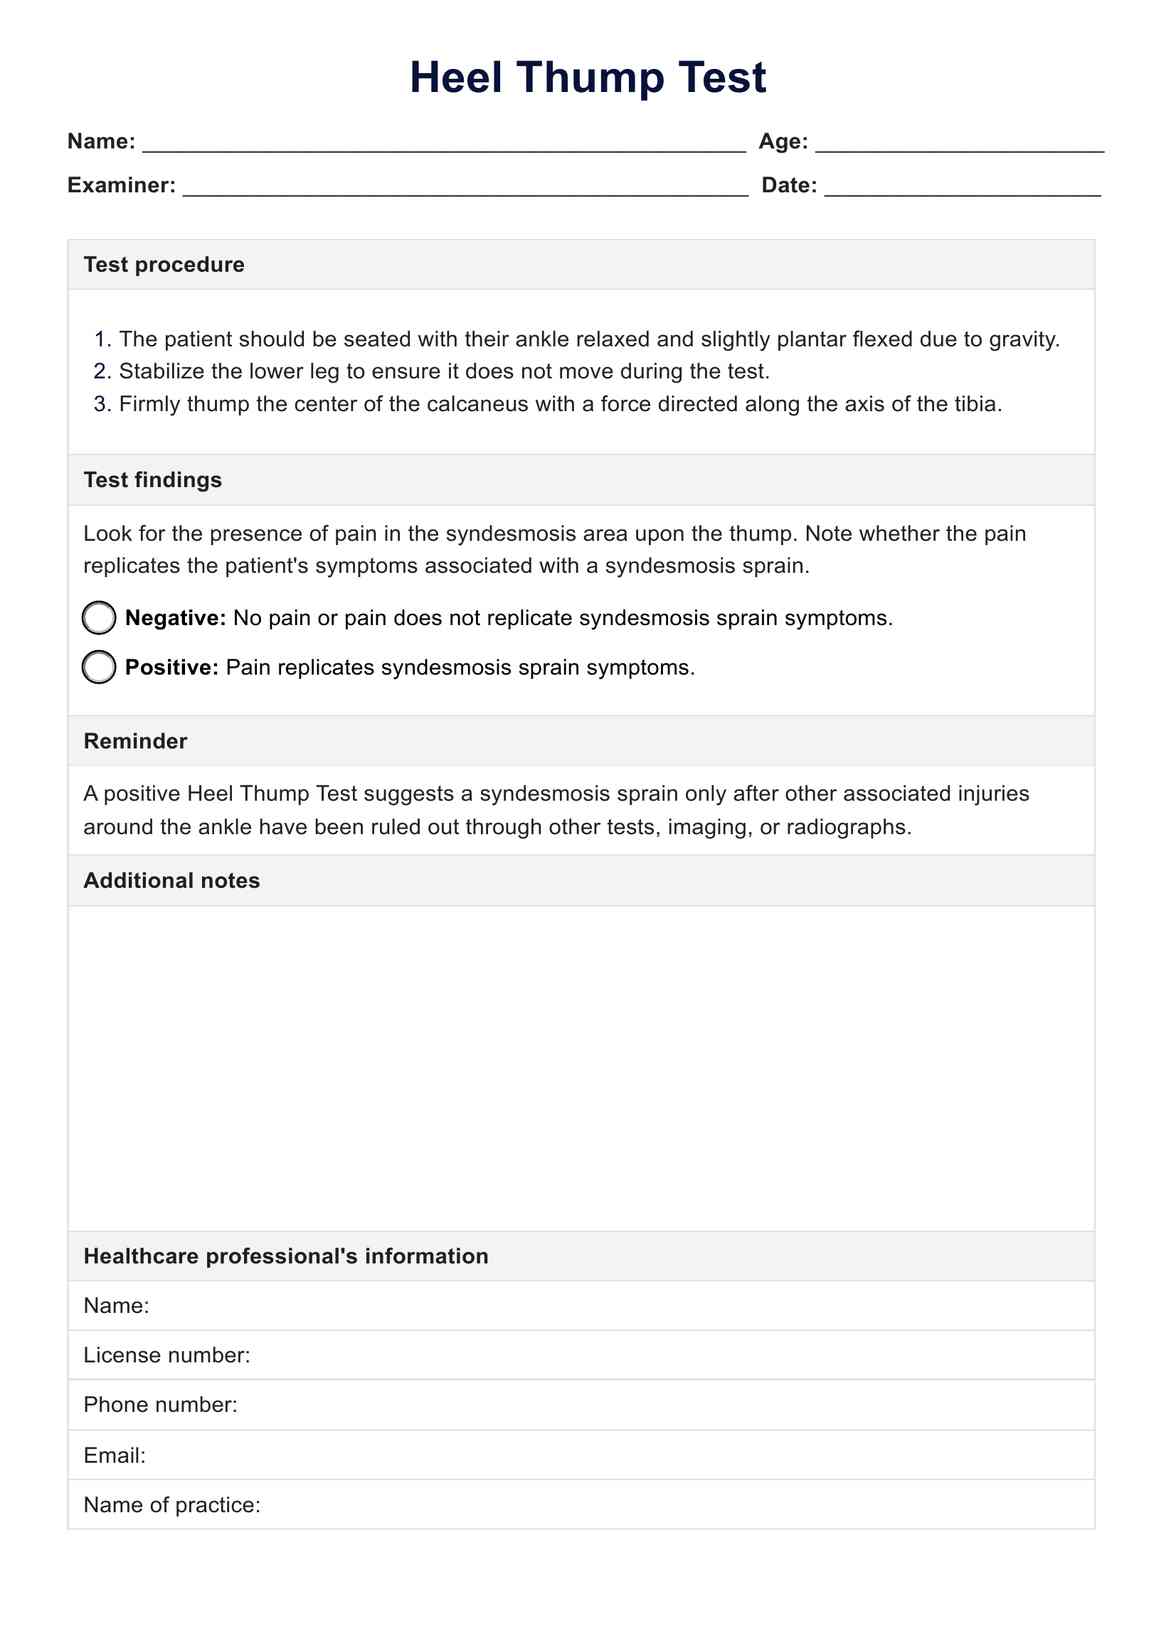
The Heel Thump Test, also called heel percussion test, is a clinical assessment used to diagnose syndesmosis injuries, also known as high ankle sprains. This test specifically evaluates the integrity of the syndesmosis, which is the joint between the tibia and fibula, by applying a sudden force to the heel. The purpose of the test is to identify discomfort or pain in the syndesmosis area, which can indicate an injury.
This test is particularly useful when a patient presents symptoms that closely resemble those of a lateral ankle sprain but are located slightly higher up on the ankle. It is used to distinguish between common ankle sprains and more severe syndesmosis injuries, which affect the joint between the lower leg bones. This differentiation is crucial because syndesmosis injuries require a different treatment approach and typically have a longer recovery period.
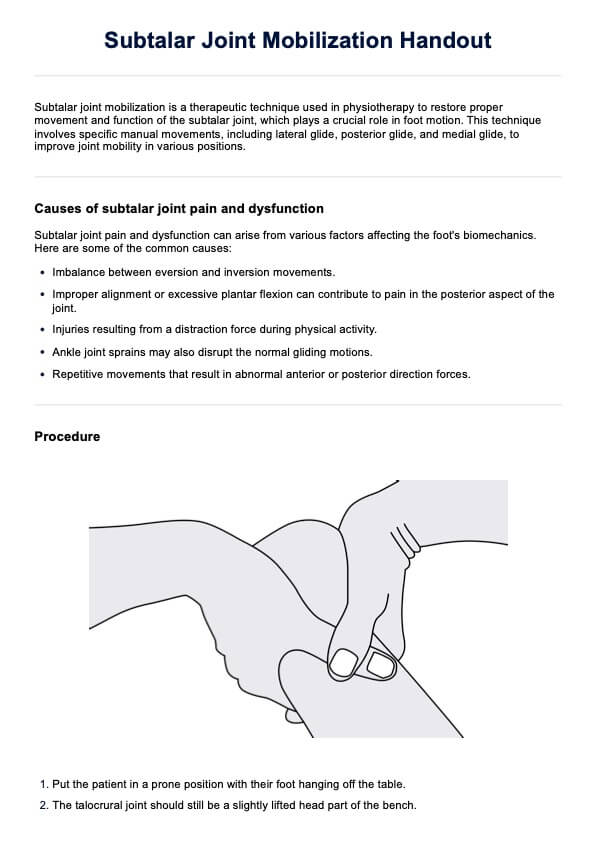
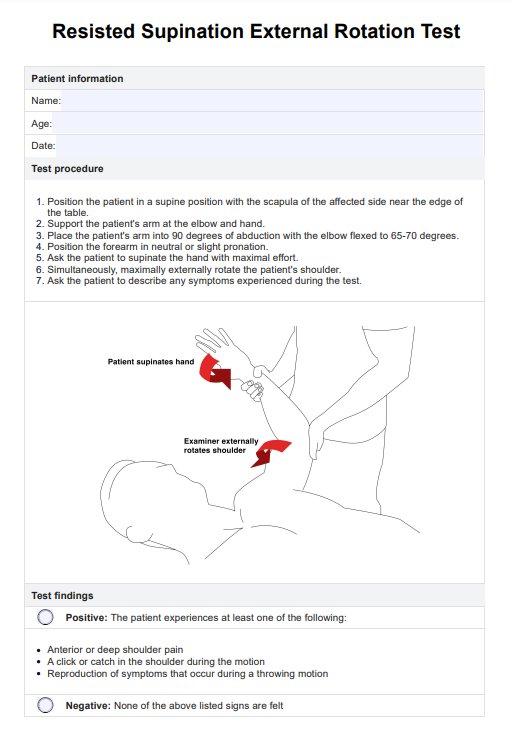
How is the Heel Thump Test performed?
Here's how the test is typically conducted:
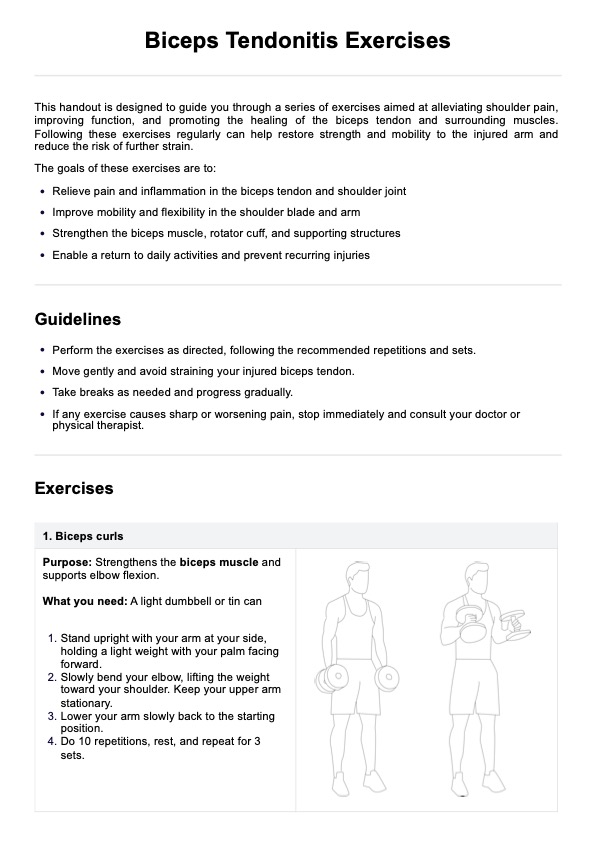
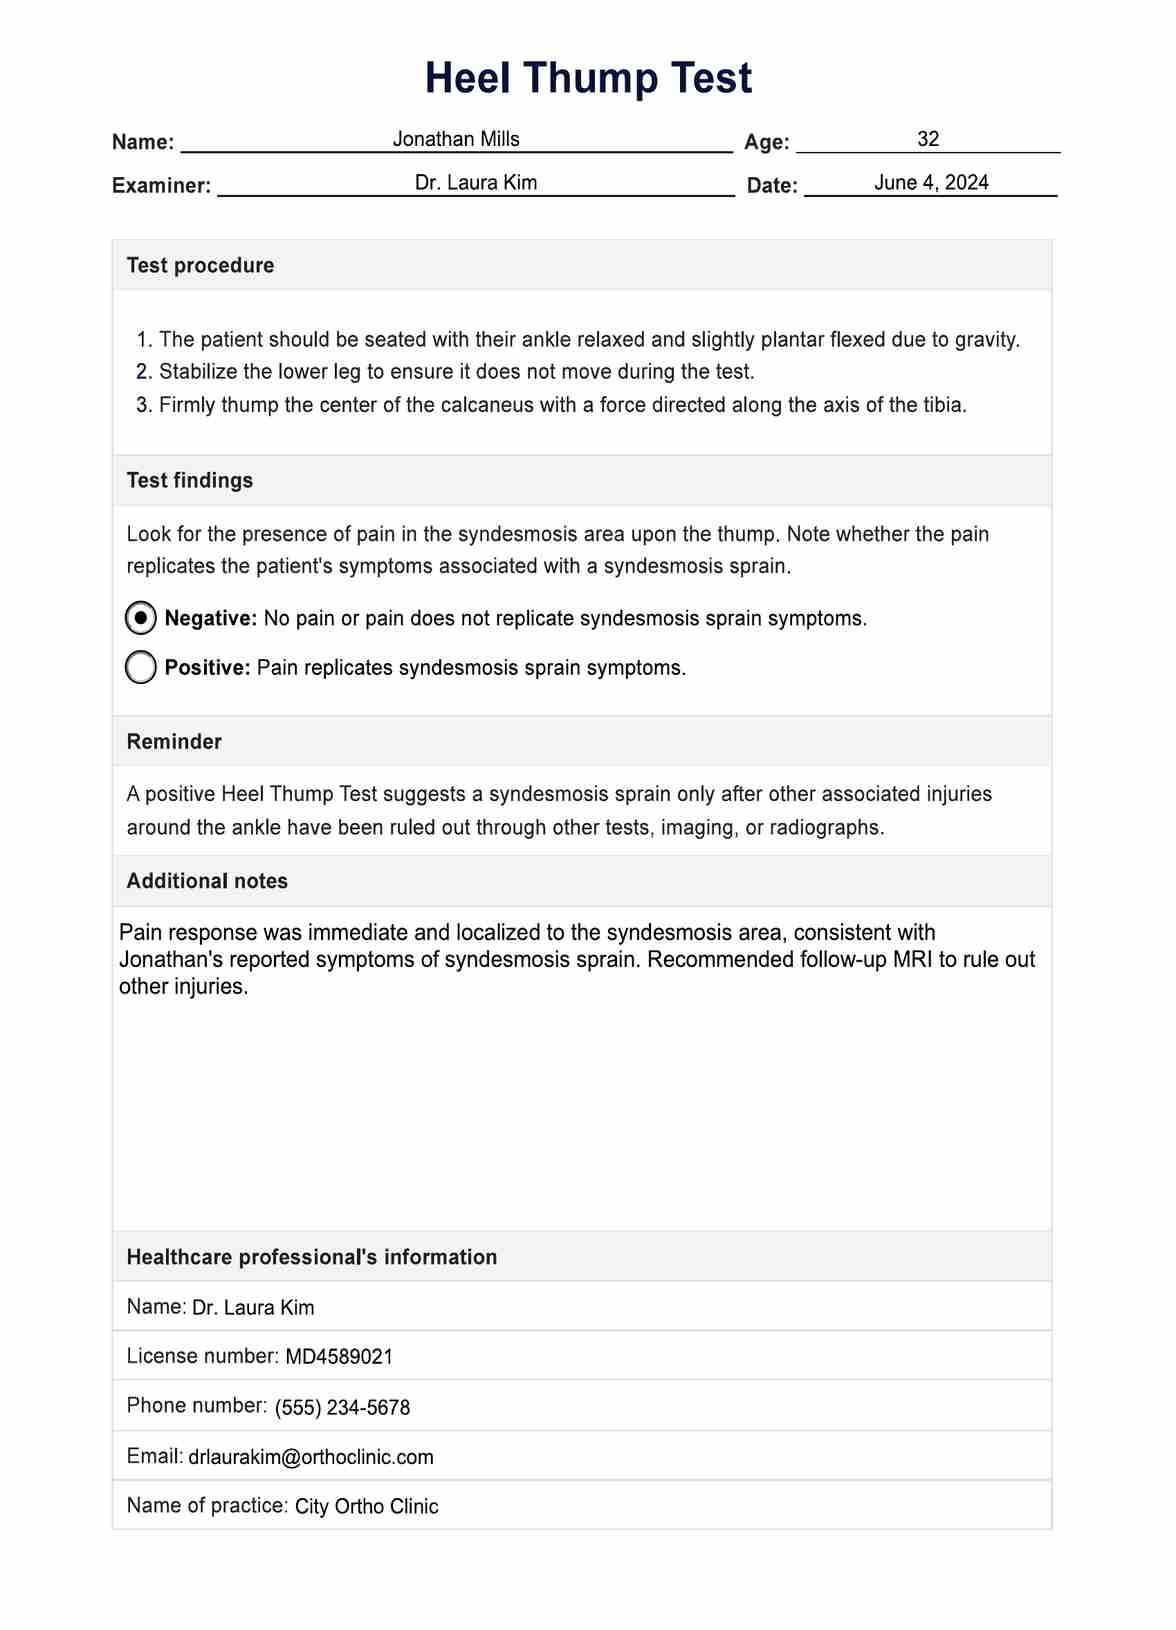
- The patient sits knee flexed with the ankle in a relaxed position, slightly plantar flexed due to gravity.
- The examiner stabilizes the lower leg to prevent movement.
- The examiner delivers a firm thump to the center of the heel, directing the force along the axis of the tibia.
- Observe the patient for a reaction (or lack thereof). The presence of pain in the syndesmosis area upon the thump indicates a positive result.
This procedure helps pinpoint the specific area of injury, making it a valuable tool in the diagnostic process for ankle injuries.
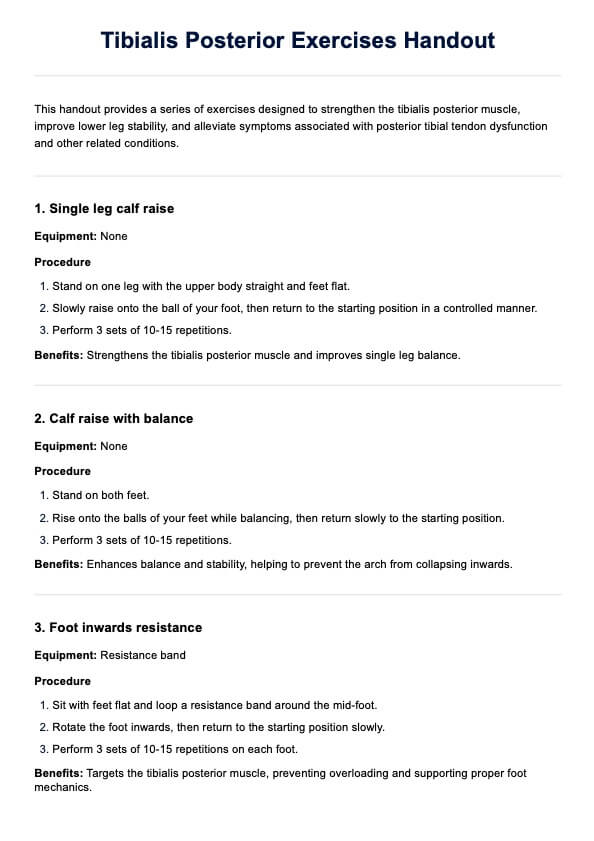
How to use our template
Our Heel Thump Test template is designed to streamline the process of diagnosing syndesmotic ankle sprains, ensuring that healthcare professionals can efficiently document and interpret the test results. Here’s a detailed guide on how to use this template effectively in clinical settings:
Step 1: Access this template
To begin, download or access the Heel Thump Test template from our website or via the Carepatron app. This template is available in digital format, making it easy to fill out on any device or print for manual completion. Ensure you have the template ready before you meet with the patient to conduct the test.
Step 2: Explain the template
Before performing the test, it is essential to explain the procedure to the patient. Use the template as a guide to discuss what the test involves and what each section is for. Inform the patient about what you will be recording in the template, such as their personal information, the test findings, and any additional notes that may help in their diagnosis and treatment plan.
Step 3: Perform the test
Follow the template to stabilize the patient’s distal leg and apply the thump to the heel. Observe the patient's reaction for signs of pain or discomfort.
Step 4: Document the results
After performing the test, immediately document the results in the template. Check the appropriate box to indicate whether the test was positive or negative based on the patient’s reaction. Use the additional notes section to detail any observations that might assist in further diagnostic procedures or in developing a treatment plan.
Step 5: Review and follow up
Review the completed template to ensure all information is accurately recorded. Discuss the findings with the patient, and plan any necessary follow-up tests or treatments. Store the document securely, maintaining patient confidentiality and compliance with healthcare regulations.
Benefits of using the Heel Thump Test template
Using the Heel Thump Test template offers several advantages for healthcare professionals, particularly those specializing in diagnosing and managing ankle injuries. Here are some key benefits:
- Consistency in testing: The template standardizes the Heel Thump Test, ensuring it is performed uniformly, which is vital for accurate diagnostics.
- Efficient documentation: Predefined fields streamline the documentation process, allowing for quick and thorough recording of test details.
- Improved patient communication: The structured format facilitates clear explanations of the test procedure and results to patients, enhancing their understanding and engagement.
- Streamlined follow-up: Systematic documentation makes follow-up visits more efficient by providing a clear record of initial results for ongoing reference.
These benefits highlight the value of using the Heel Thump Test template in clinical practice, enhancing the overall effectiveness and efficiency of medical examinations for ankle injuries.
Limitations of the Heel Thump Test
The Heel Thump Test, while useful, faces significant limitations due to a lack of extensive scientific validation and specificity concerns. It is not widely supported by research, which may impact its reliability and acceptance within the medical community. Moreover, the test may not definitively confirm syndesmosis injuries as other conditions could produce similar symptoms, highlighting the need for additional diagnostic procedures to ensure accurate diagnosis.
Another challenge is the test's reliance on subjective pain responses, which can vary greatly among individuals, potentially leading to inconsistent results. Additionally, the accuracy of the test depends heavily on the examiner's skill in applying consistent force and accurately interpreting the findings. These factors necessitate a cautious approach, often requiring the Heel Thump Test to be used in conjunction with other diagnostic tools and clinical tests for a comprehensive evaluation.
Treatments for syndesmosis injuries
Effective treatment of syndesmosis injuries is essential for proper healing and to prevent potential complications. Here’s how these injuries are typically managed, from non-invasive to more intensive treatments:
- Rest, ice, compression, elevation (RICE) protocol: Immediate treatment for subacute ankle sprains involves resting the injured area, applying ice to reduce swelling, using compression wraps to support the area, and elevating the foot to decrease swelling and pain.
- Immobilization: Wearing a boot or cast is crucial for acute ankle sprain to limit movement and allow healing. Immobilization helps to prevent further injury and ensures that the injured site is undisturbed during the healing process.
- Physical therapy: After immobilization, physical therapy is important to restore strength, flexibility, and range of motion. This includes weight-bearing exercises as tolerated, gradually reintroduced to promote healing and prevent stiffness.
- Surgical intervention: In cases where the injury does not heal with conservative treatment or involves a displacement, surgical options may be considered. Surgery may involve ligament repair for torn ligaments, or the placement of screws or plates to secure fractured bones and ensure proper alignment during healing.
These treatment strategies are tailored to ensure optimal recovery, with an emphasis on initial stabilization and gradual reintroduction of function.
Commonly asked questions
The Heel Thump Test is commonly used to diagnose ankle syndesmosis injury, involving a firm thump to the heel to check for pain in the syndesmosis area, which is indicative of a sprain.
The Heel Thump Test can also help diagnose stress fractures by identifying pain responses from a firm thump to the heel, indicating possible bone injury or fracture.
Kleiger's Test, or the external rotation stress test, is used to diagnose syndesmosis injuries and deltoid ligament injuries. The patient's foot is externally rotated while the ankle is stabilized to check for pain, which suggests ligament damage. This test is different from the Heel Thump Test.
Related Templates

Popular Templates